Showing posts with label kitchens. Show all posts

Friday, April 1, 2016

Scenes From A Renovation, Part II

Although these pictures are a disaster, much progress is happening on our renovation! The kitchen window has been replaced with a much smaller window.  I know this might seem like a bad idea, and in some ways it is, but it allows us to actually have both cabinetry and open shelving.

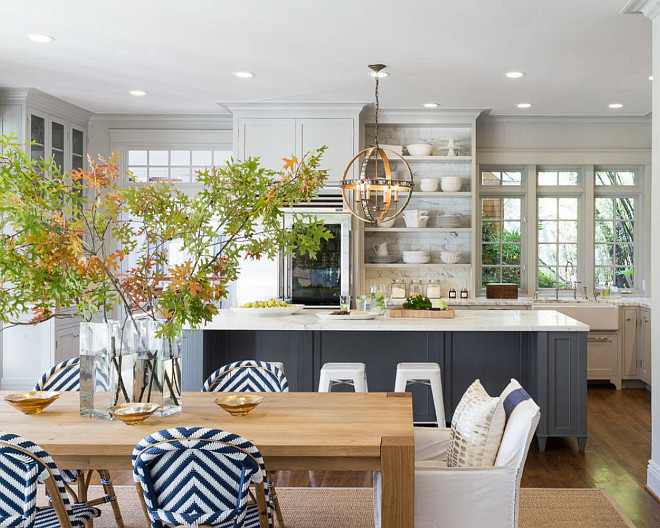
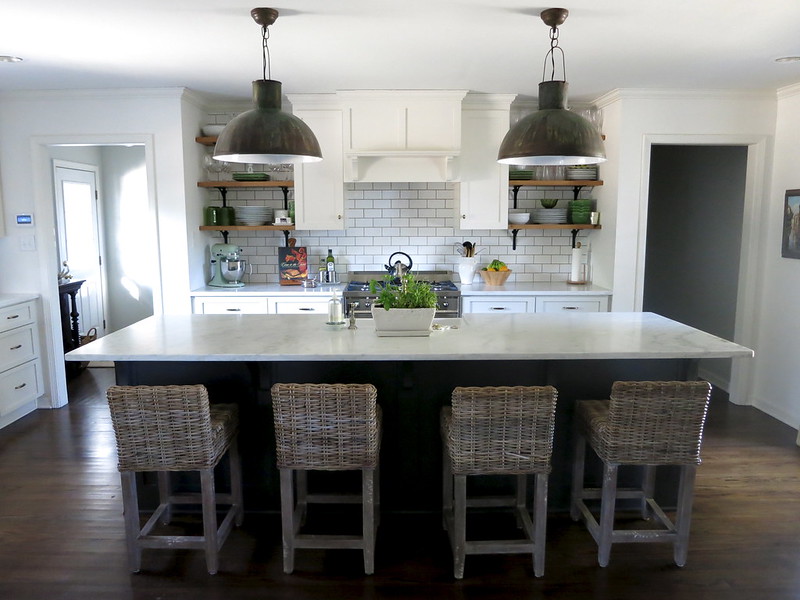
Here are two shots of the kitchen, first with the old larger window:


And then with the new smaller window:


I will admit that when I walked in to see this little window I had a panic attack. Who makes their windows smaller, anyway? But Jay reminded me that to the right of the window there are cabinets and to the left of the window there are open shelves.  These shelves were on my absolute must-have list for our kitchen and something I've always wanted. We are also considering replacing the working window with a fixed glass pane so that it's less busy there. It seemed important that we be able to open the window above the sink, so we're going to live with it this way for a bit and see.

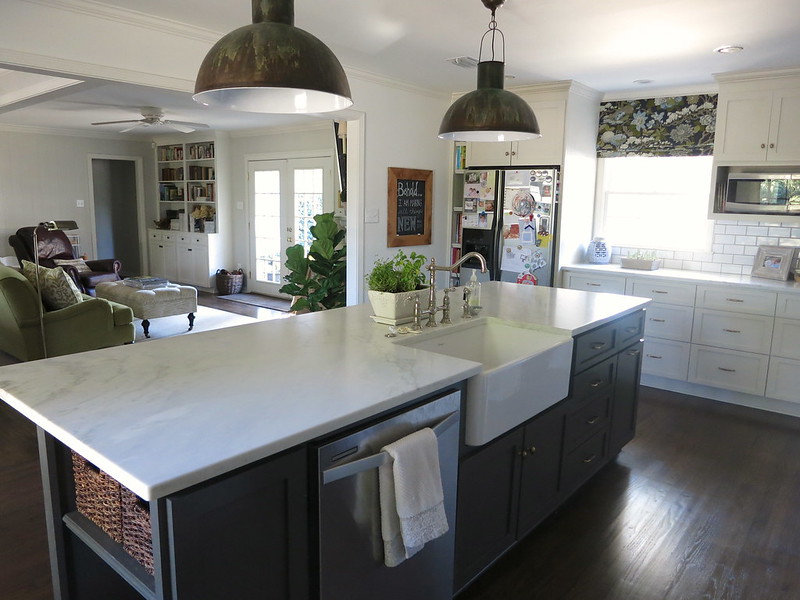
You can also see that we opened up the wall where the stairway goes down to the lower level. The light blue door will be replaced with a full glass garden door, meaning plenty of light, and a pretty sight-line into the backyard will be visible to the space.


On the other side of the space, in the living room, the fireplace has been chipped out. We will be moving the fireplace surround a couple feet to the left, so that it is centred on the wall with built-ins on either side.  Honestly, this fireplace has made furniture placement near impossible in the room and just needed to be moved. This portion of the project may come in phase two, since the flooring has eaten up more of our budget than we anticipated. In the meantime, the gas will be moved to the appropriate spot so that when we're ready to finish this part, we can move forward easily. 


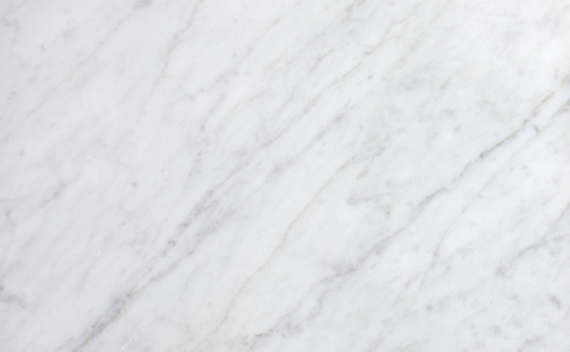
Counter-top selection, and cabinet colour sample in actual space
Then we picked up a drawer front from the finisher so we could see how everything looks together.  I looooove it. It's a bit hard to tell the colours in the iphone pic below since it was poor light when I took this quick shot this morning.  There is actually much more contrast between the counter selection and the cabinet doors.  Things are looking a little on the 'cooler' side so I'm hoping the wood floors and shelving warm things up a bit. 

Counter samples, wall colour and actual drawer front 


So things are still moving forward. Decisions are being made about finishes! Also moving forward this week are:
  • wood floors ordered (oak with stain colour to be determined) and installed
  • electrical plan rough-ins are installed for pot lights and fixtures in all the rooms
  • drywall has gone up on the ceiling and walls


Still lots of work to do, mess to clean up and decisions to be made!

Meg


Tuesday, March 22, 2016

Scenes From a Renovation

I mean, who doesn't love a dirty, messy, ripped apart home?

view from living room into kitchen

These shots are from our first day of tear out.  We've ripped out the cheap hardwood flooring, down to the original hardwood, only to discover peel and stick vinyl tile in the front entrance and the entire kitchen area. We were hoping that the hardwood ran throughout the main floor, so that we could just refinish it.

Once we discovered the problem, I considered  tiling those areas, but because the original hardwood is 3/8", and the tile would be thicker, we would have to incorporate an angled transition, which I don't like.

kitchen, right side


view from left side of kitchen into dining room


 Now we are considering installing a pre-finished hardwood floor versus installing an unfinished floor and having it stained and finished on site.  Our decision will depend largely on price (!) since this has added to our budget considerably.

view from living room towards dining room

I'll post a few of the samples we got in the space so that you can weigh in on the decision.

Meg

Wednesday, February 17, 2016

Everything but the Kitchen Sink

Since space is tight in our little kitchen, we're looking for a really specific sized undermount sink.  It has to fit into the cabinet, which is 33".  This is trickier than you might think.

Let me back up a little.  I've always wanted a porcelain apron front sink.  All my life, really.  I love the farmhouse feel they give. But as we were planning our kitchen, I found myself thinking about other options.

Here's the problem: when you first walk into our front door, you can see the sink.  There's a window above it but the first thing you always notice (or at least the first think I notice) is a dish pile-up. We only have a single sink basin right now, so there's no place to put the drying hand-wash dishes other than on the counter beside the sink. Believe me, I wish we were the type of people who always had time to dry all our hand-wash dishes as soon as they were clean but we're more apt to leave them to drip.  Who has time for stuff like that?

As we looked at sink options, I just didn't think that an apron-front sink would look as nice.  This was surprising to both of us, really. I don't want to draw any more attention than necessary to the dishes that are in the sink (dirty or clean and drying). I feel like an apron-front sink would put more focus on that from the front door.

Criteria for  new sink:
Double Basin, deep enough to hide dishes
Stainless, cause it's pretty and easy to clean
Small, to fit the 33" cabinet it belongs in but big enough to fit our mess

As soon as I let go of my apron-front farmhouse sink dream, I began to really like other options.


Like the above Kohler Strive Sink, which is the sink my dreams are now made of. Except it doesn't come in a small enough size, which breaks my little heart.  I love how the divider between the basins is only half height so that you can fit lots of pots in there.  I also love the accessories that come with this baby.


Then there's this Soleil Sink (above), which is pretty slick looking too.  Basins are divided fully which would also allow for more drip-dry dish storage, I guess.


This guy is from Kindred, which was recommended to us by someone.


Now to talk about the sink jewelry... the faucet.  We're thinking a bridge faucet in polished nickel.  We may splurge here, because you can see it from the front door and I would like it to be really nice.  Here's a couple we're considering.  I found them on the Wayfair.ca site - I'm so glad we have this resource in Canada now.


Rohl


Kohler


I'm pleased that things keep moving forward with our project. There are so many small decisions to make about each detail - it feels a little overwhelming sometimes. But I'm really excited too.

Meg

Friday, February 12, 2016

Kitchen Drawings

We're working on narrowing down kitchen counter options right now.  I really, really, REALLY wanted Carrara marble. It is the most consistent element to almost all the inspiration kitchens that I've pinned and admired.  I definitely want the counters to look like a lightly veined, white and gray marble.


But there's also the wear to consider. They're prone to etching, staining and pitting. We do have the marble in Elliott's bathroom and it has held up really well over the last two years - no signs of wear that I can see.  I've read tons of reviews of marble counters, and looked at so many different options for look-a-likes.

We did some research at our stone supplier this week.  Right now the front-runner if we don't go with Carrara is a Quartz counter-top that looks a great deal like marble. It doesn't have the same cold feel, but it was really hard to tell the difference from looking at a slight distance. Basically, it has the looks we're going for, but will be easier to look after.  We do have a house full of teenagers here, after all. Coffee and spaghetti spoons aren't always washed immediately, and are often left on the counter.

In terms of the overall design of the kitchen and dining area, we've done a lot of thinking about how we need the space to function for our family.  Remember that it is very small and a lot of the areas serve double duty.  For instance, the banquette where we'll be eating meals is also the homework center for our kids and the place we do household paperwork.

overall kitchen layout


One of my favorite things about this plan is the banquette.  I've long been a lover of this style of casual eating.  Our table is actually a round pedestal, which will extend into the living area when we have big groups over. you can see the banquette elevation below, with the two pantries on either side.  The left pantry is actually quite deep and will provide storage for all those things you need in a kitchen but don't use every day. I'm looking at you, waffle iron and bread maker. The other pantry will house our daily-use dry goods, like boxed cereal, chicken broth and lunch snacks.


View of fridge and microwave area (left), and banquette with flanking pantries (right)


 The cabinetry on the stove side will go up to the ceiling and provide much more storage than currently exists in the kitchen.  The hood is a custom design my husband is building.

Stove wall, with cabinetry to ceiling height.


I'm really excited about using open shelving on the sink wall, below. I think it will be a great place to store our every day dishes - right above the dishwasher. We will most likely tile this whole wall.  The shelves will be wood and we might use some brackets as well, instead of floating shelves.  We are actually reducing the size of the current window in order to make more room here for the shelving.
Sink wall, with open shelving on left over dishwasher.


It has been a heck of a week around my house this week, with lots going on in my personal and work life. Having the kitchen reno to think about has been such a great distraction.

Hope you have the loveliest of weekends!

Meg

Monday, February 8, 2016

Narrowing Down Cabinet Colour

This weekend we got samples of two BM paint choices for our kitchen cabinets.  We're going with a light gray colour. The grey of the perimeter cabinets in the kitchen below is what I'm looking for.

Gray Owl OC-52 Benjamin Moore.:
just barely gray

Benjamin Moore Whale Gray 2134-40. Benjamin Moore Whale Gray 2134-40. Benjamin Moore Whale Gray 2134-40. Benjamin Moore Whale Gray 2134-40 #BenjaminMooreWhaleGray #BenjaminMoore2134-40 #BenjaminMoorePaintColors
via

I picked up two colours that I thought might work from Benjamin Moore, and painted them on a canvas so that I could move the samples around my kitchen. The perimeter cabinets in the kitchen above are BM's Gray Owl, which was the front runner for my space too. I also selected BM Moonshine to try out.  They're very similar colours.

Yeah, like practically the same colour in some lights.

Left: Moonshine, Right: Gray Owl

 I moved the canvas around and we decided that we liked the Gray Owl the best for our cabinets.  It's very neutral and light, with just enough colour to make it different than white. I might also get a sample of Coventry Gray to try, even though I think it might be darker that what I want.

I'm going to leave you with this question:  who creates a dishwasher panel out of two drawer fronts stuck to a white dishwasher with construction adhesive??? Who does that???

Can't wait to get this project started.

Meg

Tuesday, February 2, 2016

On Missing Blogs, Blogging, and New Adventures

Obviously, I don't really blog anymore. I often miss writing and keeping a journal of the process of our home projects. Sometimes, when I'm feeling like I don't get enough accomplished, I page through my older posts. I love seeing the progress we made renovating our homes. I love the way I documented our family's journey.

But even more than I miss writing this blog, I truly miss reading good DIY, home decor and decorating blogs. So many home blogs that I used to love have disappeared! Bloggers aren't really only blogging anymore, more often posting on other forms of social media. Somehow along the way, blogs became competitive - followers, likes, advertising, and unique views. As a result of feeling too much competition, blogging became something I didn't really want to do anymore.

Although it makes me sound sort of stalker-ish, I miss reading about the lives of bloggers I used to follow. You know, when a blogger acquaintance had a baby... or it was somebody's birthday and they posted about the party.  I miss these voyeuristic glimpses into their lives when they got a little more personal along with their creative projects and the encouragement I felt for my own.

I have friends in real life, a family, and a career that involves interactions with thousands of university students.  I'm busy and active and doing stuff.  But I still miss the sense of community I felt with home bloggers sometimes.


Our home has gone through so many changes since I last posted about our little ranch.  It is looking really beautiful in some areas, and still needs work in others - probably like most people's homes.  We've completed our son's bedroom and bathroom, the basement, our master walk-in closet.  We've added a deck, landscaping and a hot tub (so good!) in the back yard.  We've created some pretty cool headboards and shelving units out of barn board.

Moving Forward...


One of the best things that writing this blog did for me was keep me honest and accountable to the projects I was working on.  Instead of finishing a project 80% of the way, and leaving the details and accessories undone, I actually felt driven to complete it. That way, I could photograph them for the blog and post them. I also created design boards, which helped to direct the outcome of each project we worked on. I think these steps are the missing pieces to the successful completion of our current renovation projects.

We are about to embark on a main floor renovation that includes a new kitchen, dining room and living space.  As usual, Jay and I are doing the contracting and building, including the demo, and finishing. Some things are being contracted out to keep us to our timeline (ha!) and some parts of the project will be DIY.

These are the lights we are considering for the kitchen and hallway areas. Please feel free to weigh in if you strongly prefer A or B options in the comments.  I will say that Jay strongly prefers option A. Our cabinetry is a very light grey finish - BM Grey Owl.  


We are several stages into the planning process for this renovation.  We have had architectural plans drawn up, revised them and have settled on a final plan for the layout of the kitchen and dining room.  The reno has created a sort of domino effect causing some extra work in the living space as well.  

I'm looking forward to sharing the details of this reno here.  I'd also like to catch you up on all the work that has been completed over the last while. You know, if you're still reading. This will help to keep me organized and on track with the project in a way that will be really helpful to me.  It will also document the project along with the others I have completed here. 

Meg


Friday, January 24, 2014

This Kitchen...


IMG_0202

   is so good. 

 I don't think I have ever seen a kitchen renovation that is more me than this one.  I even have one of those lights in my dining room! It's exactly the feel I'm looking for once we decide to take the renovation leap.


IMG_0208

We haven't gotten our thoughts together enough to do any kitchen reno planning at our new house but this one sure comes close to what I imagine the finished product would look like.  I love all of the materials and finishes.  The cabinetry - the mix of dark gray and off-white, as well as the simple shaker style.  Of course the subway tile and marble counters are my first choice. 

You can check out the full details about this kitchen on Create Live Design.  

so Meg

Monday, September 10, 2012

My New Kitchen

It's been a long time coming but I thought you'd like to see my new Kitchen.


Frankly, this renovation almost killed us.  But we managed to get it done and stay married. 

Remember when we moved in and it looked like this?
before

See that wall on the left side?  

We made some large structural changes to the kitchen by removing the wall between the existing dining room and kitchen.  This made room for a peninsula and created a better traffic flow for our family.  It also served to open up the entire main floor.  The light in there is amazing now and the house feels so much larger!

Here is a view of the dining room, from the living room at the front of the house:


You can see the peninsula and how removing the wall created an open and airy feel.  
I love the view from here.


As a result of opening up that wall between the kitchen and dining room, we had to close up the large, non-functioning doorway in the hallway. It was an amazing french door - 4 feet wide!  But it was warped in the hinges and wouldn't even open.  I'm taking suggestions as to how to repurpose it.

before


I love the ceiling we installed.  It might be my favourite thing about the new kitchen.  Especially since it was a dropped ceiling before. 

So there you have it.  Hope you like it as much as I do!

I'm back now so you'll see more regular posting again. The renos are done, the kids are settled in at school.  I'm looking forward to putting a little more personality into the spaces we've finished.  I'll keep you posted!

xo Meg


Friday, August 31, 2012

Finished Kitchen Snippets

Here are a couple snippets of my finished kitchen.


I know you guys deserve better than instagram photos.  I'm working on the styling and will shoot some good photos soon. 
 
What do you think?
 
xo Meg
 

Friday, August 24, 2012

The Kitchen

Guess what?  My kitchen's almost done!

I thought we'd never get here and I'm so excited to share the rest of the progress with you!  I was just looking back at the last couple of posts about the kitchen and I can't believe how far we've come.

But, like the total tease that I am, this isn't a reveal post. 

The last finishing touches are happening this weekend and we're still waiting for the counter installation (Saturday morning).  But I couldn't resist checking back in with you.  I've missed you after all!

When last we spoke, I was bummed about the idea of caulking and filling the millwork on the ceiling.  (Does anyone else hear The Black Keys "Gold on the Ceiling" every time I say that???)

I'm not going to lie.  This. Job. Sucked.  But it looks killer!


painting in progress


Ceiling all painted out. 
You can also see the hood vent cabinet in this photo.  Jay built all our cabinets.  This one is waiting for spraying in this photo.  That's also why the paper is taped to the ceiling.  We didn't want  to risk overspray hitting the ceiling. 
 
 I know these pictures are crappy but I tried to document the process the best I could and my iphone was always handy. 
 
 
In the above photo, you can see the fridge cabinet and the trim around the window starting to take shape.  That is still the old sink and cabinet in the centre.  Remember, we are living through this crazy renovation so we kept the sink in place for as long as possible.
 
Here are the last couple progress shots of the kitchen during spraying:
 

Hood Vent Cabinet (and a furniture kick too!) in the process of spraying.

Fridge Cabinet & Peninsula in the process of spraying.


Corbels for the peninsula.
 
 
I'm not going to pretend this process has been easy.  There have been temper tantrums, budget freak-outs and tears.  It has been hard on our marriage, and our kids. But it has been so worth it.  I love the way the new kitchen is looking. 
 
I can't wait to show you the 'after' shots!
 
xo Meg
 

Wednesday, May 30, 2012

Kitchen Inspiration Board

     I've been working on this for a while.  I would say that I absolutely know my kitchen style in theory.  In practice, however, I'm struggling.  Here's the thing:  I like a warm white kitchen, white subway tile and white shaker cabinetry.  Sounds pretty good, right?

   It also sounds like every other kitchen you see in blogs, magazines and on pinterest.  I have dozens of them pinned on my kitchen board.

  It's hard for me to reconcile the idea that these are the finishes I like and the idea that my kitchen would look the same as everyone else's.  Do you ever feel this way?  I love the inspiration I find in the blog world but I feel like there is a lot of repetition.  And I want my kitchen to be unique.

Below is my inspiration board so far.  I still need to decide on a few things.  Hardware needs to be chosen, possibly a fabric for the window to help add some personality to the space.


     I've been trying to come up with a couple of ways to make the kitchen feel more unique.  These ideas are at the bottom of the mood board I made for the project.  

1. Antique Corbels:  I was going to use these in Audrey's room but the scale wasn't right for the project we were thinking of.  Instead, we are planning to use them as decorative supports for the peninsula.

2. Tongue & Groove Ceiling:  To be painted out in white dove, like the cabinetry.  Adds a custom element.

3. Antique Bronze Shelving:  This is something Jay came up with.  He would like to hang the open shelving using antique bronze tubing like this. Our shelves will be thick and painted white.  This image is from The Brick House.  (I am still unsure if this is the route we will go.  Initially we planned to use simple thick white shelving with brackets and I go back and forth a bit)

4. Concrete Countertops:  Right now, we can't afford the marble I would really like to put in.  It's just not possible with our budget.  I was resigning myself to the idea of using a simple black laminate but then I saw this DIY tutorial and I'm thinking about trying it.

I'd love to hear what you think about the finishes we've chosen, and your ideas for injecting some personality into the space.

xo Meg

Tuesday, May 15, 2012

Kitchen Lighting Design

Thanks for the sweet comments about my new fab tongue and groove ceiling.  Some of you liked it more than others (Elizabeth - it is called tongue and groove so I suppose kissing is appropriate).

Today, I'll offer up this drawing that Jay did that we are working from.  I took a really high tech photo of it with my iphone.  Let's pretend we took the time to draw it up in auto-cad, shall we?


This is the basic layout.  It's a decent sized space, but there are doorways and windows everywhere that  make the design a little tricky.  I'll post some more about the layout of the cabinetry later this week.

For now, the lighting plan.


The kitchen will have one hanging pendant over the sink, two over the peninsula and a centre ceiling fixture.  We are on a very tight budget for this reno but I think lighting is really important and both of us want something that makes a statement.

These two fixutres are in the running for the centre light fixture in the middle of the room:


I love both of these lights.  I think the apothecary lantern makes things a little dressier and the schoolhouse is more casual.  We will be using the oil rubbed bronze.


This light will be going over the peninsula(2) and over the sink.  


The look we are going for is a slightly industrial-farmhouse-cottage style.  Whaaaaat?   I know that doesn't make any sense.  Here are a couple pictures to further explain the look we are going for:


via pink wallpaper
via planete deco

via

See how they all have simple, almost traditional cabinetry with industrial lighting and accessories? I don't really know what to call this style but I sure do love it!

I'd love to hear your thoughts on the central light fixture.  Would you go with the lantern or the schoolhouse?

xo Meg