Showing posts with label DIY. Show all posts

Friday, August 2, 2013

Audrey's Room Reveal

I feel like we worked on this project for a hundred years.  And the truth is, it isn't quite finished yet.  But really, what in this house ever is?  Things are always evolving and changing as we get used to living in tighter spaces and with less stuff.  

Audrey was so surprised by her room transformation and we are very pleased with how it turned out. 

Especially since we started with this:

before

after


The most notable thing that we are still missing is the bedskirt.  My mom seamstress is still working on completing the box pleated skirt in the striped fabric.  I figure I can wait for the free labor. 


The fabric was super duper cheap.  It's from Ikea and comes in at a whopping $6.99 per metre.  When we found it, I was so surprised at the heavy weight of the fabric and the perfect colour palate it gave me to work with.  If you remember, Audrey wanted a riot of colour and I wanted calm, simple and more neutral.  I feel like we really struck a perfect balance here.


We both really love the desk wall.  Jay made the desk out of two brackets we bought and some wood he cut to fit the exact space.  I painted the brackets in the same aqua as the bed to unify the space.  I especially love how all the bright colours pop against the dark chalkboard wall here.  The desk is the perfect size for Audrey, although it doesn't offer any storage.  She isn't really one to put things away anyway ; )


This way, her pencils and markers are right out on display so she can keep things tidy (hopefully).


I also think this little hook system will help keep her things up off the floor.  It's funny, when I was spraying out all the frames I absolutely detested this lime green colour we used, but now it's one of my favourite parts of the room.  Audrey, of course, loves it.

So there you go.  One room looking good.  I'll talk about sources and paint colours in another post.

What do you think of Audrey's new room?

xo Meg

Thursday, May 23, 2013

Farrow & Ball Bumblebee

I wonder if it's normal to be as obsessed with wallpaper as I am.  Not just any wallpaper, although I do really like so many.  I'm obsessed with Farrow & Ball's Bumblebee wallpaper. This is not a new thing, either.  I've loved it for such a long time. 


 I've never wallpapered anything or used wallpaper in our home.  I have, however, spent a ridiculous amount of time removing wallpaper from Elliott's Room and our Hallway.  That may explain why I've never wallpapered anything.  But I really, really want to use the Bumblebee on the ceiling of my master bedroom.  Like, really.  

Here are some of the colour combos I'm considering:


 I'm leaning towards the first one.

What do you think about this wallpaper?  Do you think it's weird that I'd want bees overhead?  Is this obsession unhealthy?  Any advice for a novice wallpaper-er contemplating the use of super-expensive wallpaper DIY style?

xo Meg

Wednesday, May 30, 2012

Kitchen Inspiration Board

     I've been working on this for a while.  I would say that I absolutely know my kitchen style in theory.  In practice, however, I'm struggling.  Here's the thing:  I like a warm white kitchen, white subway tile and white shaker cabinetry.  Sounds pretty good, right?

   It also sounds like every other kitchen you see in blogs, magazines and on pinterest.  I have dozens of them pinned on my kitchen board.

  It's hard for me to reconcile the idea that these are the finishes I like and the idea that my kitchen would look the same as everyone else's.  Do you ever feel this way?  I love the inspiration I find in the blog world but I feel like there is a lot of repetition.  And I want my kitchen to be unique.

Below is my inspiration board so far.  I still need to decide on a few things.  Hardware needs to be chosen, possibly a fabric for the window to help add some personality to the space.


     I've been trying to come up with a couple of ways to make the kitchen feel more unique.  These ideas are at the bottom of the mood board I made for the project.  

1. Antique Corbels:  I was going to use these in Audrey's room but the scale wasn't right for the project we were thinking of.  Instead, we are planning to use them as decorative supports for the peninsula.

2. Tongue & Groove Ceiling:  To be painted out in white dove, like the cabinetry.  Adds a custom element.

3. Antique Bronze Shelving:  This is something Jay came up with.  He would like to hang the open shelving using antique bronze tubing like this. Our shelves will be thick and painted white.  This image is from The Brick House.  (I am still unsure if this is the route we will go.  Initially we planned to use simple thick white shelving with brackets and I go back and forth a bit)

4. Concrete Countertops:  Right now, we can't afford the marble I would really like to put in.  It's just not possible with our budget.  I was resigning myself to the idea of using a simple black laminate but then I saw this DIY tutorial and I'm thinking about trying it.

I'd love to hear what you think about the finishes we've chosen, and your ideas for injecting some personality into the space.

xo Meg

Monday, December 5, 2011

Hint, Hint.

Just a little hint about what I'm doing right now.


(inspiration images via my pinterest)

It involves a fair bit of aqua paint and one very happy little girl!

Hope you're having a super Monday.  Well, as super as a Monday can be anyway.


xo Meg

Thursday, December 1, 2011

Flippin' Out!

Since a few of you have asked to see a bit more of the house we flipped last winter, I thought I'd show you these lovely before and after shots.  Keep in mind, we staged this project a little bit but it was not fully decorated.

The kitchen of this home was for sure the biggest transformation.  Here are the shots of that so you can see the progress:


These are the before shots:


We combined the existing dining room and kitchen to make one larger kitchen.  There was another room adjacent that was perfectly proportioned to be the dining room.

Kitchen space, all opened up and drywalled.

Kitchen all done.

Here are a few others from around the house:

Living Room Before


After


master bedroom before

master after (walk in closet and vaulted ceilings)

master bedroom, headboard wall


little bedroom before (sorry about the darkness)


little bedroom after


Hope you are all having a great week.  Sorry for being MIA this week, things have been so busy!  I'll check in tomorrow with my Friday Fave post!

xo Meg

Friday, November 18, 2011

My New Holiday Strategy

Ok, it all started when I read Angie's post about how she gets ready for the holidays in November so that she can really enjoy Christmas with her family during December.

via

I am traditionally a last minute Christmas gal.  I usually cram baking and shopping and parties and wrapping all into the last week or so before the big day. Madly scribbling off Christmas cards and enclosing photos printed at the last minute.   It makes me feel stressed for most of the month of December.  You know, worrying about getting it all done and that something will fall through the cracks.  

via

The reason this usually happens is two fold.  First, I am a procrastinator.  I run on high adrenaline, getting stuff done at the very last second.  It only makes sense that this would spill over into my yuletide strategy.   Second, my boy's birthday is November 28th and my hubby's is the 29th, so I'm usually working on something for them right up until the first of December.


one of my christmas crafts, via


However, just as Angie inspired me to organize my back to school strategy, she has inspired me to re-think my Christmas strategy.  Basically, the idea is that if you get all the administrative details of the Christmas season done in November, you can really enjoy all the festivities that happen in December!  Makes sense, right?


Here's all the things I need to get done, and my timeline for their completion!


You can watch my blog to see the progress of some of these holiday projects.  I'm linking up to this fun party, that I saw on A Thoughtful Place:


 Maybe you'd like to join up too?

Happy Friday!  My kids are home because it's a PD Day at their school.  That means a houseful of my own and a few spares.

xo Meg

Thursday, November 17, 2011

The Singin' Chandy

I can't believe it's already Thursday.  I have been working so very hard (on Audrey's room and at work) that I haven't had a free moment to post!  My apologies!  

I do have something sweet to show you:


I want this Songbird Chandelier from Anthropology soooo bad for Audrey's room.  The only thing holding me back is the $798 pricetag!  I've posted about the lighting in here before.  You know, I was looking for something whimsical and fun that reflected her personality.  But it still has to work with the rest of our home...  The songbird is perfect, right?


Well, guess what I found at Homesense?


It's a birdcage!!!!!  

(ok, that light I showed you on Monday is stuffed inside so it looks kinda funny)

I'll be using the cage, along with this old light:


And these new friends from Michael's:


Can't wait to show you the finished project!


xo Meg


Monday, November 14, 2011

Audrey's Junkyard Bedroom


Jay and I unearthed all the thrifted and gifted finds we have for Audrey's room.  The weather here is perfect today so we were able to start the sanding, prepping and painting process for these pieces.  I am so glad to be starting on this work.  I can't wait for my girl to have a beautiful room!

I'll tell you a bit about our plans for the pieces.  

We found those two corbels in an antique shop in Barrie.  We will use them to support her desk in the little corner with the window (photo lower left).  I think they will be painted a turquoise colour.  There will also be some built-ins over there.  A wardrobe, desk and window seat are planned.  Paint selections to come this week!

We will also use the hutch top for storing her crafting supplies.  I need to find a way to get her organized.  I'm thinking small bins and baskets with labels on the shelves of the hutch. I have a couple of cute DIY ideas for in there.  She is terribly messy.  Hopefully this helps.


The image above on the right is the wall that will have her bed and night tables.  You can't tell from this photo but window is centred.  The pelmet that is giving me nightmares will go up there with curtains and the bed will go in front of the window.


This iron bed was given to us by a sweet little old lady who had just finished her garage sale.  We saw her putting it out by the curb and stopped to ask if we could buy it.  She wouldn't take any money for it, once she met little Audrey.  Her name was Audrey too!  We have had the bed for 6 years now - just waiting for us to fix it up.  We are thinking turquoise.


These frames will also get a coat of paint.  The artwork will go elsewhere. She's just getting the frames but I have other work to go in them.  I feel a little bad about painting the gold one since it's actually pretty nice.  Maybe I'll leave that one as is and paint the others.  Off white?  Shades pulled from her fabrics?  Not sure yet.  


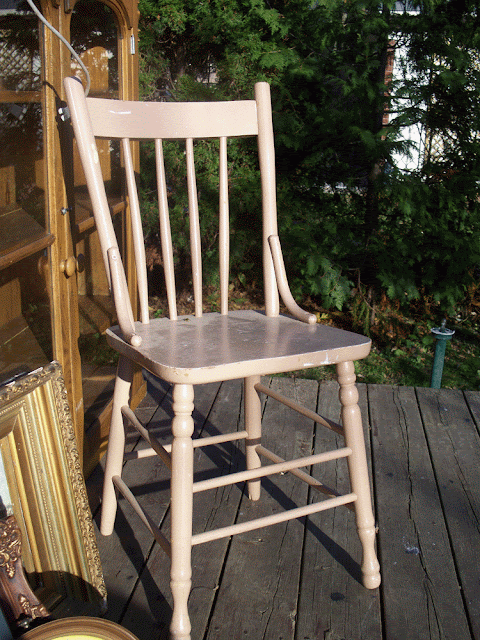
This chair came from my Grandma's house.  It needs a coat of paint and a soft seat cushion and it will be perfect for Audrey's desk.


We found this old light in the crawlspace under our back porch.  Pretty soon, it's gonna be super-awesome.  I'm leaving you in suspense...


xo Meg


Thursday, November 10, 2011

It's my birthday and I want a falafel.  Specifically, this falafel, from Can You Stay For Dinner?


Looks good, right? Just spy-ed the recipe here.  And I'm making it for dinner tomorrow night.  Not tonight, cause Jay's doing the cooking (and the clean-up).  

One other thing... 

This is my 100th Post!  

Interesting that it co-incides with my 100th, er, 35th Birthday!

I have so loved writing this blog.  It is probably the most creatively committed I have ever been in my life.  You see, I'm really good at coming up ideas and plans and always have the best intentions for following through with them.  It's just that I often lack the commitment it requires to be a real finisher.  

To commit to completion is hard for me for some reason.  

Something about this blog has changed that for me.  For instance, the old me would probably just have given up on the whole pelmet thing in Audrey's room.  But now, I feel accountable.  And also, somehow convinced that I actually can finish something.  You guys finish stuff all the time.

So thank you for reading.  Thank you for inspiring me every day with your creativity, DIY skills and comments here.  Thank you for sharing your families and stories and homes and for listening while I shared mine.  I wish I knew you in the real world.  I would certainly invite you over for a mason jar full of cake to celebrate with me today.


via


Instead, I'll be arm wrestling my Pfaff 130 and the Pelmet fabric. You know, finishing what I started. 

Wish me luck.

xo Meg

NOTE:  I forgot to add the links yesterday to Jenny and Cassie's Pelmet posts.  I have added them now!

Wednesday, November 9, 2011

Audrey's Pelmet... FAIL!

   I wanted to make a pelmet for Audrey's window, the one above her bed.  It looked pretty easy when Jenny did it.  Cassie managed to do a good job too.  So I thought, why the heck can't I do that?

Well, here's why:

   I have constructed the frame for the pelmet .  I made it out of 1 x 2 lumber scraps that Jay had.  That part went well, since he cut and nailed it together for me.  It fits the spot perfectly.  Below is a crappy phone shot of the wood frame that is getting bracketed to the ceiling.  The fabric (with box pleats) will be stapled to the frame.


  The sewing part is nearly killing me.  Seriously.  I cut out the fabric all wrong for the first go and made the hem too small ( only 1/2 inch) so it looked cheap and homemade.  NOT the look I am going for.


Remember this image?  This is the look I'm going for.  

   I put the project aside to cool down and think it through again.  I still have enough fabric to try again and I can re-use the stuff  I screwed up to make toss pillows.  However, that leaves her windows with half-hung curtains that look pretty awkward without their pelmet topper.  That's ok, she's just happy  they're turquoise.  I will NOT be showing a picture of this epic fail.  Maybe I should, just to keep it real.
I didn't take one though.

   In other news, my parents are almost ready to completely move out of our house.  This is good news, although I will miss having them around.  It's good news because we can finally set up our downstairs family room.  We are still storing some of my parent's stuff but at least the TV, Wii and Playstation are now installed and the kids can get the heck out of my hair have a place to go.

Tomorrow is my birthday.  The big 3-5.  I'm treating myself to an all-out torture session at my sewing machine.  Hopefully the results are better.  Even if they're not, I'll post some photos.  I will need someone to laugh with.

xo Meg