Showing posts with label small space living. Show all posts

Friday, June 3, 2016

Bamboo Chairs

I can't even tell you how long I've searched for a pair of Chinese Chippendale bamboo chairs at estate and garage sales, kijiji, and Craig's List. I know there are some areas where furniture in this style is easy to find, but here in Southwestern Ontario, they were pretty elusive.


So, when this ad came up on a my local kijiji site, I emailed instantly.  The chairs are rattan, and they've certainly seen better days.  Some of the wicker wrapping at the joints is missing but they're sturdy. 

Our dining area has a banquette (which I loooove)

obviously unfinished: missing toekicks, crown molding, etc.


The banquette seat will be upholstered and so will the chair seats. Here's the fabric I've selected:

Robin's Egg Herringbone along with my existing Chiang Mai Dragon pillows.
I'm trying to decide how I want this chair makeover to look.  I know (think?) I want to paint the chair frames because they will need some repairs that would be obvious if I leave them natural. I'm thinking about colour options for the paint. 


White frames:

via

Black frames:

Saarinen tulip table + black Chippendale chairs. Why oh why did I sell my Chippendale dining set?!?:
via


Navy Frames:

THE MITTEN COTTAGE: - Lake Room :: gold curtain rod with navy blue and white print curtains:
via - I would probably go more like BM's Hale Navy than this blue


Still working things out.... feel free to weigh in!


xo Meg


Tuesday, May 31, 2016

Nailed it! Hardwood Floors

This project has definitely been a learning experience for me. When we pulled up the red engineered hardwood that was installed by the previous homeowner, we hoped to be able to re-finish the small slat hardwood that was original to the house.

original hardwood

But things don't very often go exactly according to plan with a project like this one. The original wood was badly damaged, and it wouldn't be worth the patch and repair job that it would need. Neither one of us thought that the floors would turn out well with so many patches needed. We decided to install new sand-onsite unfinished oak floors.


newly installed oak floors


These floors are a thing of beauty.  I'm so pleased with how they turned out.  After these photos were taken, the floors were sanded and stained and finished with a satin clear coat. They're very durable and the colour of the stain turned out exactly as I hoped.  Because there are no grooves or gaps between the planks, they don't collect dirt and are very easy to clean. 

So we are definitely making good progress in our reno. Finishing the floors really opened things up so that the space has a much larger feel. I'm looking forward to sharing the finished floors, my beautiful cabinetry and a new-to-me pair of bamboo chairs that might make an appearance around the dining room table. 

xo Meg


Tuesday, March 22, 2016

Scenes From a Renovation

I mean, who doesn't love a dirty, messy, ripped apart home?

view from living room into kitchen

These shots are from our first day of tear out.  We've ripped out the cheap hardwood flooring, down to the original hardwood, only to discover peel and stick vinyl tile in the front entrance and the entire kitchen area. We were hoping that the hardwood ran throughout the main floor, so that we could just refinish it.

Once we discovered the problem, I considered  tiling those areas, but because the original hardwood is 3/8", and the tile would be thicker, we would have to incorporate an angled transition, which I don't like.

kitchen, right side


view from left side of kitchen into dining room


 Now we are considering installing a pre-finished hardwood floor versus installing an unfinished floor and having it stained and finished on site.  Our decision will depend largely on price (!) since this has added to our budget considerably.

view from living room towards dining room

I'll post a few of the samples we got in the space so that you can weigh in on the decision.

Meg

Tuesday, February 12, 2013

Dining Room Before and After

   I did some work on the main floor of our house this weekend.  And man, it's amazing what a little paint can do.  We are in the process of re-thinking and re-purposing all of our furniture for use in the new house.  It's tricky to move our 'style' from vintage traditional to something that will work in our 60's ranch. 


The existing yellow walls weren't helping.  Neither was having a boob light as our dining fixture.  So first, we corrected that little problem.


I decided to use my all time favourite white, Benjamin Moore's White Down (CC-50) for most of the space.  I was thinking that the addition of a little black and white to our scheme would make our wood furniture look a little edgier.  


This is where things got tricky for me.

If you've been reading for a while, you know I'm a colour chicken.  Neutral Nelly.  Plain Jane.

Not that there's anything wrong with that. 


We decided to paint the back wall of the dining area in an almost black grey colour.  Whaaat? We went with Sherwin William's Urbane Bronze, partly cause everybody always raves about this colour.  I painted the little swatch on the wall from the gallon Jay so boldly purchased, stepping out onto the limb with me.  I was totally nervous about it and, we lived with the swatch for a few days, like you're supposed to.  After much discussion we decided not to do it.  


I know.  What a chicken, right?


And then I looked at the collection of accessories for the room that was sitting on the table (see above picture for the swatch and collection).  And Jay said, "Look how good all that crap looks together!"

And I thought... yeah... let's see this plan through and decide what we think when it's all put together.


And I LOVE it.


The computer isn't staying here or anything.  There's just some construction going on in the office and our kids can't live without it for long.  Accessories need to move in, art needs to be hung.  So I guess this isn't a true before and after.  

Also, I'm thinking of painting the sideboard green.  It's not precious or anything.  In fact, we don't even like it as it is.  If I do paint it, I'll move the demijohn to another space.


What do you think? 

xo Meg


Thursday, December 1, 2011

Flippin' Out!

Since a few of you have asked to see a bit more of the house we flipped last winter, I thought I'd show you these lovely before and after shots.  Keep in mind, we staged this project a little bit but it was not fully decorated.

The kitchen of this home was for sure the biggest transformation.  Here are the shots of that so you can see the progress:


These are the before shots:


We combined the existing dining room and kitchen to make one larger kitchen.  There was another room adjacent that was perfectly proportioned to be the dining room.

Kitchen space, all opened up and drywalled.

Kitchen all done.

Here are a few others from around the house:

Living Room Before


After


master bedroom before

master after (walk in closet and vaulted ceilings)

master bedroom, headboard wall


little bedroom before (sorry about the darkness)


little bedroom after


Hope you are all having a great week.  Sorry for being MIA this week, things have been so busy!  I'll check in tomorrow with my Friday Fave post!

xo Meg

Wednesday, August 31, 2011

The Reveal: Elliott's Room


   This room has been such a labour of love... and a long time coming.  Jay and I worked so hard pulling it together and we are so happy with how it turned out.  More importantly, Elliott is thrilled.  It's the quirky, mature space he wanted.  The room is tiny and that couldn't be helped.   At least now he has a special room designed just for him.

 Welcome to Elliott's Room!  The rug is from Turkey.  My Mom brought it home for us when I was pregnant with Elliott.  


Jay made the captain's bed, which has two huge drawers that house Elliott's clothes.  The barnboard I scrubbed was installed on the headboard wall.


Jay also made the desk out of the rough pine salvaged barnboards.  The artwork includes framed prints from an Anthropology Calendar from 2008, a real snakeskin in a shadowbox, and initial letter from PB and a bulletin board I covered with a map of Ontario and painted red.


I made the curtains from some Ikea panels on my Grandma's old sewing machine.  You can also see the teeny closet, which we had dubbed the 'hobbit hole'.  It actually runs the length of the bedroom, perfect for hiding out and reading.


I made this Union Jack Pillow yesterday using some leftover fabric I had from the curtains and an old Pottery Barn shower curtain.  The light is from Barn Light Electric.


There are a few details I still want to complete.  Things around here are always a work in progress.  It's funny, the room turned out completely different from the inspiration board I originally made for the room.  But we couldn't be happier with the results.  I'd love to hear your feedback!

xo Meg


Just a note:  I'm going to do a little work on the photos in this post.  I'd really like for them to look a little more professional.  I struggle with photography - I don't have an expensive camera or know much about it!  If you have a suggestion for a photography resource, I'd really appreciate it.


Friday, July 29, 2011

Interim Kitchen Reveal

 We've been working really hard around here, getting the place spruced up enough that we can comfortably live here.  Lots of changes made.  Lots still to come.  


I'm working on Phase One of the renovation process.  This phase just makes it livable for us for now.  It's a little baby step in the right direction.  I've just about finished this process for the kitchen.  

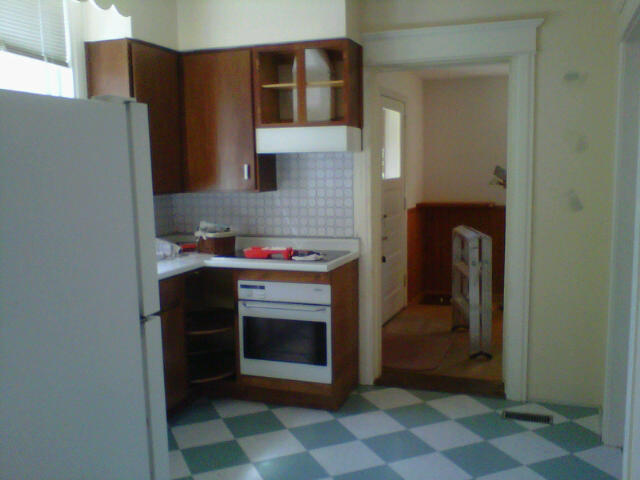
The kitchen before.  You can see my office through the doorway.


An in process shot of the kitchen with the doors removed, being primed out.  


And now:


We needed to work with the existing green checkerboard floor.  I like checkerboard.  I wouldn't have chosen this colour but it is what was there.  I happened to have the vintage birds artwork along the same colour lines, so I thought I'd use it as my colour inspiration for the room.  


What we did:
- painted out the cabinetry in BM White Dove (OC-17)
- replaced the hardware with simple, inexpensive nickel knobs and pulls from Home Depot
- painted the walls BM Whale Gray (2134-40)
- used silver spray paint on the brass hinges

Still to do:
- spray paint  the red (?) fisherman's light with silver spray paint
- paint out the sideboard in a deep blue
- maybe paint the frame around the vintage birds artwork
- maybe add a couple more images to make a more substantial gallery wall
- make curtains for the window

Note:  there is nothing I can do about the location of the plug above the sideboard at this point so I just have to live with it.


    This is the view into my unfinished little office.  I love this space so much!  I mean, I will once I get it looking the way I want it to.  It is a perfect little nook for my computer.  The room also has a powder room, pantry closet  and door to the back yard in it.  It works perfectly for me right off the kitchen.


And this is Gilmore, my photographer's assistant.  Love him and all his fuzzy goodness.  


xo Meg

Thursday, July 28, 2011

Buildin' A Room for Elliott

    Oh,  Elliott.  He is the boy who willingly gave up the largest room in the house to his little sister.  All because he is the sweetest 10 year old I know, and because his teeny room has a teeny closet door which we have dubbed 'the hobbit door'.


(This is from before we moved in.  Note the 'hobbit door' to the left of the window)

    As we have begun to settle, we have determined that Elliott's room isn't really that small, especially in terms of an old house.  Old houses have small rooms and small closets.    I have no problem with the decorating of the room.  We're going with a sort of nerdy, ivy league, Canadiana kind of feel.  It's exactly Elliott.

This is my original design board for his room:


     Much harder than the decorating is the function of his small space. We have started to figure out just what Elliott's room needs to function.  It needs a captain's bed and built-ins including a desk and shelves.  So Jay and Elliott drew some designs up.  And this weekend, we're going to start building!

So, some inspiration for Elliott's bed, from my pinterest:


I love the built-in bed and desk with shelves above in this image.  We are considering doing two sets of stacked drawers under the bed.  This will raise the bed up some, but give Elliott more storage.

We are also planning a trip to the salvaged lumber shop that Jay uses for work this weekend.  We are thinking of panelling the wall behind his headboard with salvaged wood.  


Should be a busy weekend.  I'm excited to tackle this room though, cause it is such a disaster right now.  And I want Elliott to love it and feel like it's special, even though it's the smallest room in the house.

 My first task:  strip the painted-over wallpaper.  Ugh.

xo Meg